Thayer Hut.
After carrying a heavy pack over the rough moraine of Castner Glacier for seven miles, I wasn't in the mood to scale a treacherously steep and muddy slope. The sun had already set and the purple twilit sky hung over the glaciated peaks of the eastern Alaska Range surrounding me. The dark crevasse at the bottom of the slope was choked with rocks from previous mudslides and, looking up, it appeared there could be another mudslide at anytime. I had scrambled up the same slope three years before and vaguely recalled fearing for my life, but the promise of mountain luxury awaited me and I reluctantly began the ascent.
As I crested the edge of the alpine meadow at the top, there it was: the Thayer Hut. The hut is impossible to see from below on Castner Glacier, and I've encountered people who failed to find it after making the same arduous trek—probably because they imagined it sitting atop a much shorter, less steep slope. For those that do find it, it's like stumbling onto an oasis in the desert, at least for summer visitors; in winter, finding the hut can be more like waking after a heavy snowfall and realizing you have to shovel the driveway before going to work. Fresh Dall sheep tracks crossed my path as I walked the final length to the hut, and when I followed them with my eyes I found three rams sitting on the edge of the meadow. They looked puzzled as I untied the rope holding the hut's door securely closed, but they didn't run away or even stand up. A bulge in the floor prevented the door from opening more than halfway but I managed to squeeze through, then quickly dug my sleeping bag out of my pack and went to sleep.
I awoke the next morning to something banging on the side of the hut. I looked out the window and saw two marmots scampering away across the meadow. Marmots used to occasionally chew their way through the floor of the hut and wreak havoc inside, but it seems the marmot-proofing measures undertaken over a decade ago have reduced them to nibbling on scrap wood outside the hut and the shiny aluminum sheeting which covers the hut's exterior. I didn't know what time it was, but the weather outside was unusually spectacular, so it was time to get up.

The view of Mt. Silvertip from the alpine meadow where Thayer Hut sits.
When I stepped outside, it was like stepping into the iconic opening scene of The Sound of Music. Mt. Silvertip (a popular target of climbers) towered over the meadow filled with wildflowers, shining brilliantly in a clear, blue sky. A few streams emanating from the lingering snow patches around the hut trickled over the alpine tundra. Looking over the edge of the meadow I saw a vibrant blue-green pool of water on a small bench just a few dozen feet below, with water roaring across the glacier's surface much farther down. The marmots whistled at me, an arctic ground squirrel chirped at me, and I was even yelled at by a collared pika.
I quickly began suffering from a case of "hut lassitude", a term I picked up from reading the entries of past visitors in the hut's logbook. My legs were aching from the previous day's hike and I told myself I would be more productive the rest of my trip if I rested them for a day. I spent the morning photographing in and around the hut, then spent the afternoon cooking the two pounds of frozen chicken I had brought. I tried to light the hut's 30+ year-old Coleman stove, but it was rather rusty and the fuel tank didn't seem to hold pressure when I operated the pump, so I gave up and improvised with my Jetboil to cook the chicken. I made rice as well, then buried the leftover chicken in the snow for the next couple nights' dinners.

Rice and pan-seared chicken for dinner.
I got ready for bed, then curled up with the logbook and a thermos of steaming hot chocolate. The log contains decades' worth of entertaining stories, thoughts, hyperbole, and even artwork from past visitors. One backcountry skier staying at the hut wrote about witnessing the amazing March 1989 aurora borealis display caused by the biggest geomagnetic storm in recent history. A climber wrote a heart-wrenching account of losing his dog in a crevasse on the way back from White Princess in 2006. In the early 1990s, a pair of spring-breakers from Fairbanks deserted their tent on Castner Glacier within view of the meadow and hightailed it back to the highway when they encountered bitter cold (of the forty-below-zero variety), and several hut visitors expressed concern and posited humorous theories in the log about the mystery tent until a team came to retrieve it. Many of the entries from the 1960s (when the hut was built) and 1970s seemed like they could have been written yesterday; I suppose that's because fifty years later the mountains are still in the same places and everyone still relies on crampons, rope and ice axes to climb them—and yes, you can still get a greasy burger in Delta Junction on the drive back to Fairbanks.
When I last visited Thayer Hut in July 2014, someone had donated a half-full bottle of Jameson Irish Whiskey a couple days prior marked "July 4th". Somewhat surprisingly, the bottle was still there untouched three years later. Only four or five people had left entries in the log since then, with the most recent being in September 2016 by Alaska's famed mountain runner Matias Saari. The lack of entries in recent years may simply be the result of the current logbook running out of room, but the unconsumed bottle of liquor tells a different story.
Once upon a time, there were plenty of new routes still left to be pioneered for climbers and skiers in the "Delta Mountains" (as the surrounding mountains are nicknamed), and Thayer Hut was much easier to access when the shrinking Castner Glacier filled a greater portion of the valley. I suspect many people simply opt to camp lower on the glacier now (as I have done myself), but I worry there is also less of a draw to the hut now that its first generation of patrons has grown old and alternate forms of recreation in Alaska have grown in popularity, especially motorized off-road vehicles. It's sad to think this comfortable piece of history sitting in one of the most idyllic locations in the Alaska Range may be going to waste.

Reading the logbook. The hut is well-stocked with fuel, cooking utensils, and other gear, but some (all) of the food could use tossing.
The next day I strolled up the northern "Silvertip" branch of Castner Glacier. Descending the steep, rocky slope on the west side of the meadow was slow, but once I reached the glacier I found easy walking on the moraine. After a short distance, bare ice appeared on my right but there were still a number of snow patches scattered around and it seemed most of them were hiding small crevasses. As I wound along a stream flowing down the surface of the glacier, I found part of a sheep jaw and several more bone fragments nearby. A climber wrote in the logbook that he found an entire sheep skeleton on the glacier while returning from climbing Mt. Silvertip about a decade prior, and I assumed these were the remnants. Perhaps the sheep was killed by a grizzly, wolf, or wolverine, all of which roam the upper reaches of Castner Glacier despite the barren landscape. It could have even died in a fall and met a fate similar to Ötzi, emerging from the glacier after being encased in ice for many years.
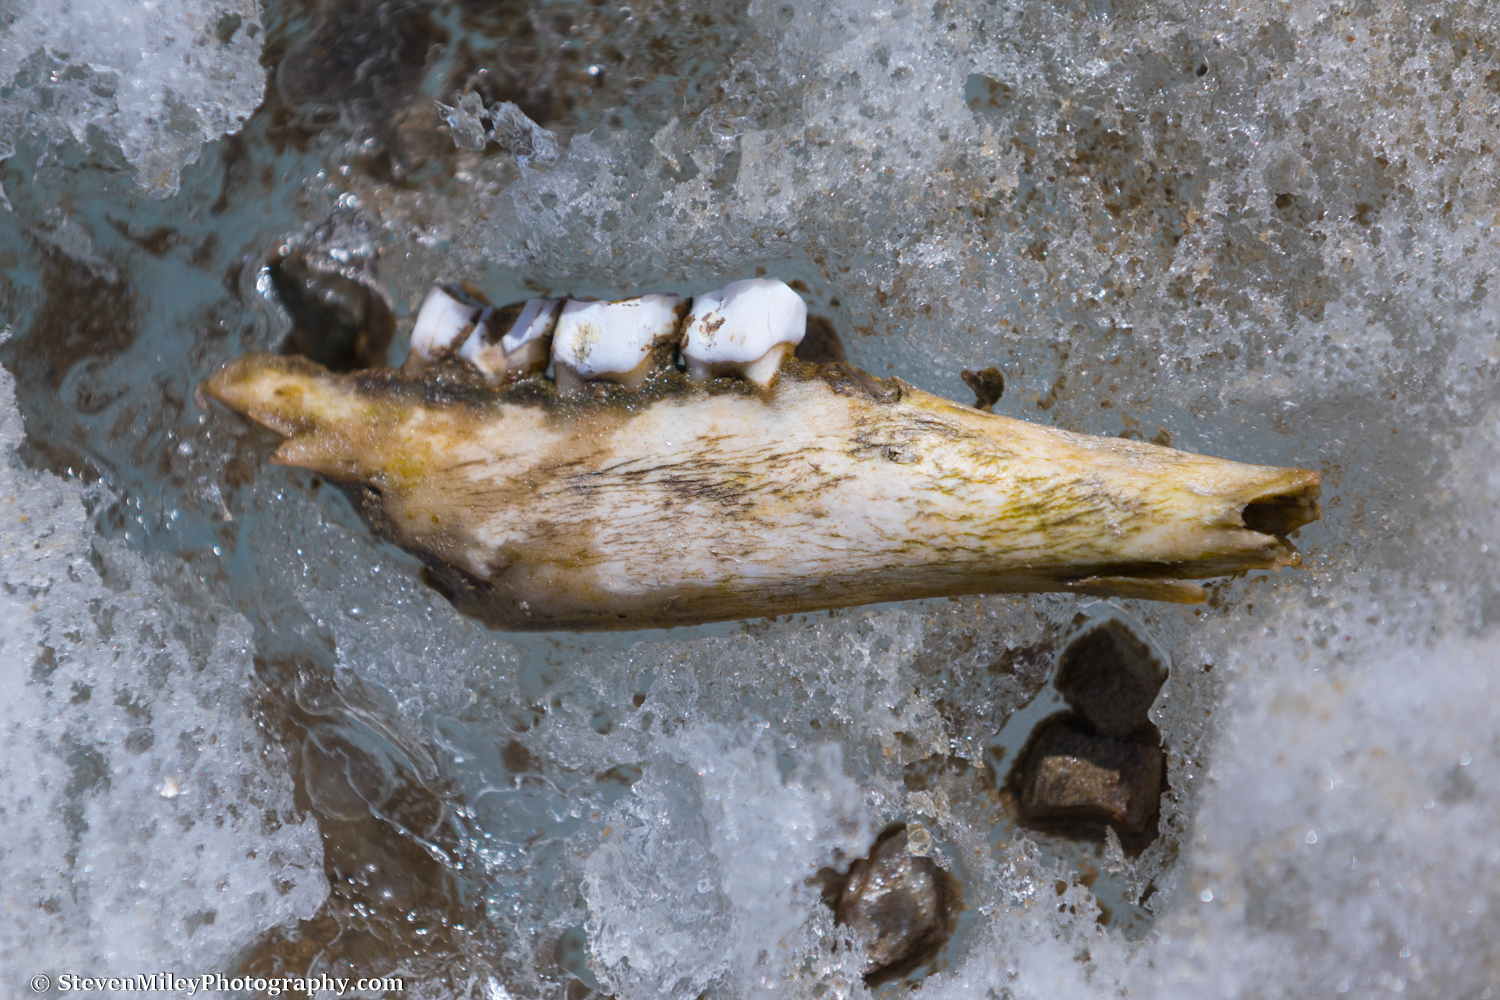
Part of a sheep jaw on the surface of Castner Glacier.
I continued all the way to the base of Mt. Silvertip. Thick slabs of blue ice spilled down its heavily-glaciated southern face, and impressive waterfalls poured over the cliffs at the mountain's base. I spied what I thought was a crevasse-free, walk-up route to the summit, but I wasn't about to climb on the mountain without a partner and a rope. Rock and ice completely surrounded me, but the sound of falling rocks and rushing water coming from all directions made the lifeless landscape feel quite alive. Though it was mid-June and the sun was shining bright, my fingers still went numb working the camera, and after I stopped to eat some cheese and a protein bar for lunch I had to start hiking quickly down the glacier to warm back up. I stopped to check out a waterfall spilling over a lingering sheet of ice on the east edge of the glacier, then laboriously hopped up boulders back to the hut.

Rock and ice near "Item Peak" above the north branch of Castner Glacier.
That night, after laying down and closing my eyes to go to sleep, I was startled by a sudden, loud rumble. Seconds later, the hut began shaking. Earthquake!
Before I could react, the shaking stopped. Having spent most of my life in Florida, this was the first perceptible earthquake I had ever experienced and I had no idea at the time how strong it had been. I checked UAF's Alaska Earthquake Center website when I got home and saw it was only a 2.9 magnitude quake centered on the nearby Canwell Glacier just five miles away. I visited the Lower Canwell Hut a month prior, and I imagine the shaking would have been a bit stronger over there.
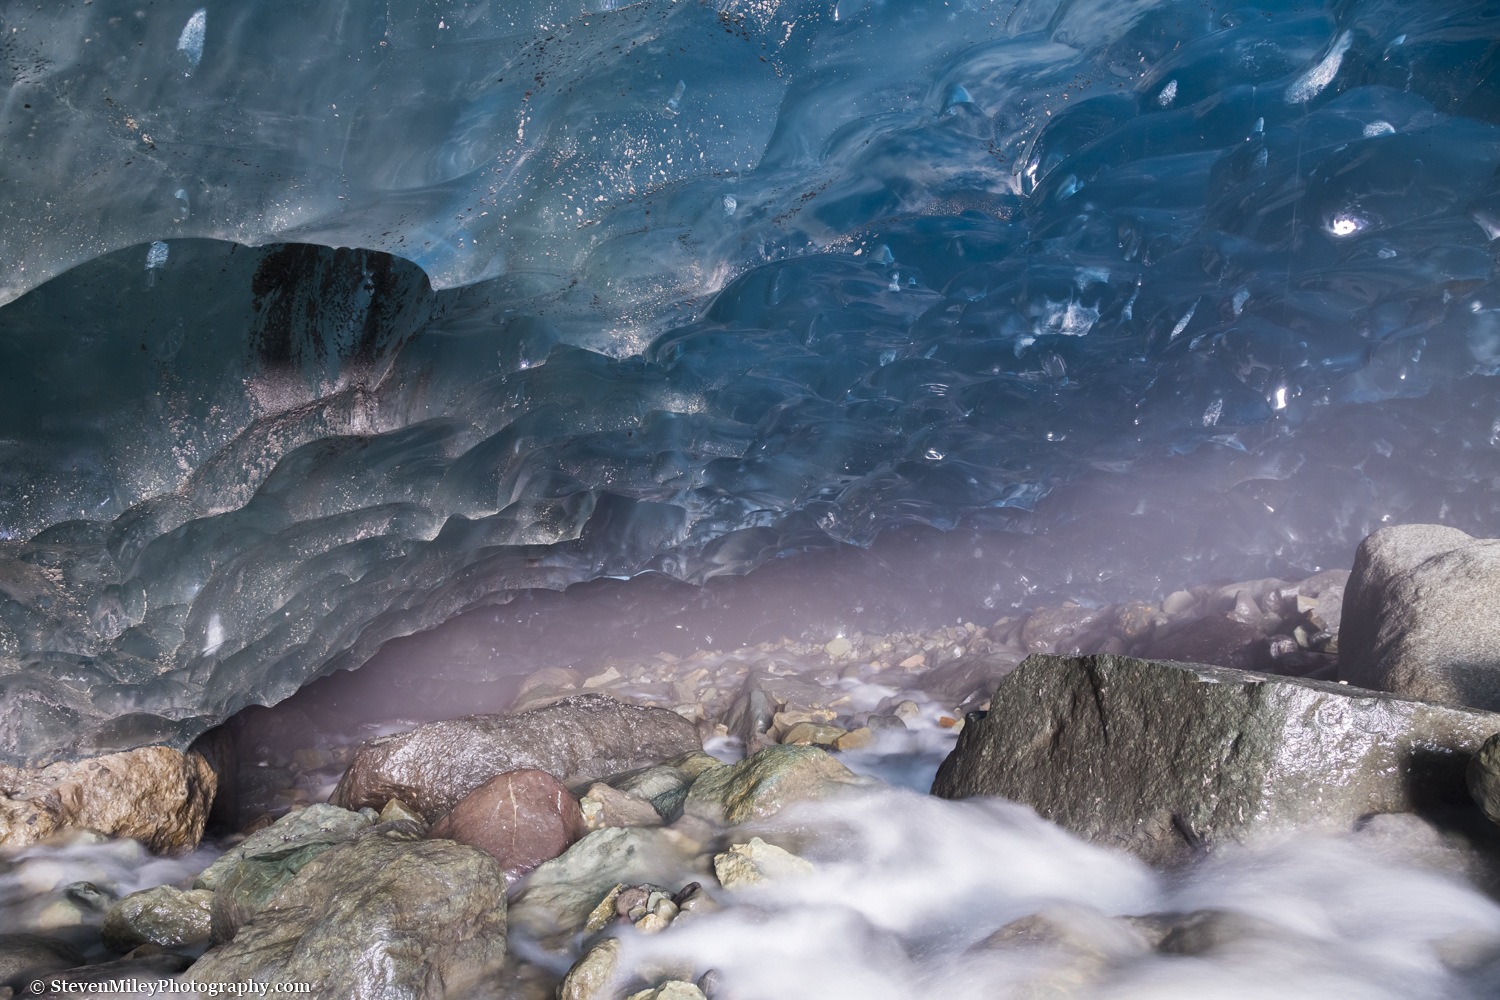
The next morning was rather cloudy, but I saw some patches of blue sky further up the eastern "White Princess" branch of Castner Glacier and decided to explore in that direction. I avoided the muddy slope I climbed on the night of my arrival and instead traversed over lower angle rock past the crevasse field on the hut's south side. A few Dall sheep ewes were grazing on the slope and they quickly retreated to nearby cliffs when they saw me, where they cautiously watched me until I was at least a quarter-mile away.
As soon as I reached bare ice, I encountered two circular snow patches on the glacier next to each other. Streams flowed into both of them but no streams came out the other side, a sure sign that moulins were lurking underneath. Moulins are deep, vertical shafts leading straight into the dark interior of a glacier, and most are wide enough for a person to fall through and some are big enough for a car to easily fit inside. I widened a small hole in the snow covering one of them and tossed some large rocks in, listening for several seconds until each one crashed against the ice in the darkness below.

One of the narrow crevasses I hopped across on the White Princess branch of Castner Glacier. Black Cap is in the background.
Farther ahead, I encountered a very narrow crevasse that ran across the entire half-mile width of the glacier. The dozens of streams running down the glacier's surface emptied into the crevasse and their collective echo sounded like a roaring waterfall even though most of the streams were barely more than a trickle. I stepped over the crevasse and continued up the ice until it became mostly covered in snow, then started walking along the bare rock of the lateral moraine. An actual roaring waterfall was carving away at the side of the glacier in one spot, and just beyond it the glacier cascaded down in a series of jagged blue walls as its slope abruptly increased. Several small crevasses began appearing on the moraine as I neared the O'Brien Icefall at the head of the valley, and I hopped over them or walked circuitous paths around them. I stayed on exposed rock as long as I could, but the crevasses became completely covered under weak snow bridges and I eventually had to stop when crossing snow became the only way forward.
I had a clear view of Black Cap but, disappointingly, I hadn't gone quite far enough to see White Princess around the bend in the valley. As I took pictures, two jets from Eielson Air Force Base painted twisting contrails in the sky over the O'Brien Icefall and blasted out a pair of sonic booms, almost as if they were putting on a private air show for me. I expect by July it would be easy to hike all the way to the base of the icefall without having to worry about hidden crevasses, and a nearby hill would provide an amazing place to camp.

The O'Brien Icefall.
On the return, I climbed up to the hut the same way I had descended and found it to be much easier and safer than the other two routes I tried. Drizzling rain fell the rest of the evening, but the sun peeked through the clouds just before falling behind Mt. Silvertip and I was able to snag a couple shots of the front of the hut in direct sunlight, a rarity because the sun is either behind the hut or blocked by mountains most of the day. I scanned the lower glacier for people and animals, but everything was quiet below. Four straight days of unusually great summer weather in the valley and I was the only one around to enjoy it.

The view climbing up "the easy way" to the Thayer Hut from Castner Glacier.
On my final morning at the hut, I washed dishes, packed up my gear, swept the floor and wrote an entry in the log. I had gotten used to life at the hut and told myself next time I would bring more food so I could stay for an entire week or two. I measured the elevation of the hut using my InReach and found it sat around 4950 feet, a little higher than the 4800 feet quoted by the Alaska Alpine Club. I descended to the glacier below via a steep scree slope on the southwest corner of the meadow, and while it wasn't too bad going down, the footing was much too loose for me to consider going up that way in the future. I measured the elevation at the glacier to be around 4300 feet. No wonder it takes the better part of an hour to climb up to the hut.
Even though my pack was ten pounds lighter and I was heading slightly downhill, the return trip took just as long as the forward journey since I was in no rush to leave. I stumbled upon two rock ptarmigan nests camouflaged on the glacier moraine, and both times the adorable flightless chicks peeped as they waddled away from me in multiple directions while the mother tried to get me to chase after her. The final mile to the glacier's terminus is always the toughest because the terrain is so hilly and the thin layer of soil and rock covering the ice tends to slide out from underfoot on relatively gentle inclines, and this time was no exception. I finally crested the last hill and stood looking down at the swift, turbulent water of Castner Creek below, and from there it was simply a matter of walking a short distance along the unmarked trail beside the creek back to my car. As I rounded Donnelly Dome on the drive home, I glanced to the south at Mt. Silvertip glowing in the golden evening sun, and I knew Thayer Hut was sitting empty on the other side. I hope it doesn't stay empty for long.
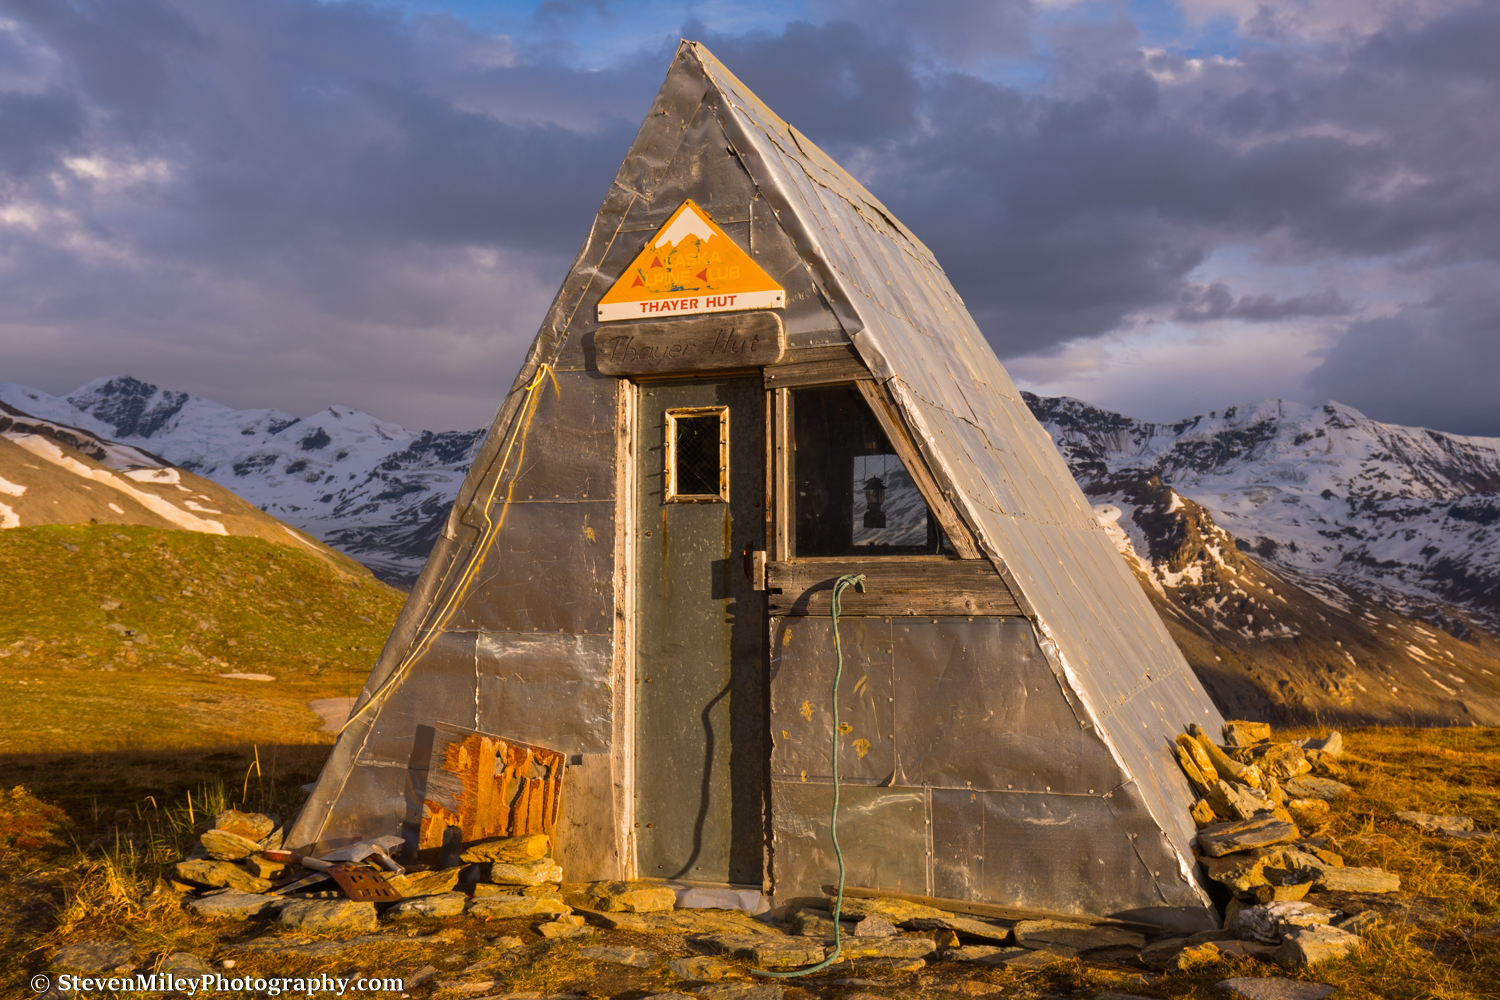
The Thayer Hut in the evening sun with the familiar lantern hanging in the window.
Interested in exploring Castner Glacier? Check out my Black Rapids Tours offerings.